With the Christmas tree curbside, and the ornaments all neatly packed away, I'm thankful for my small collection of winter decorations that can be left out a bit longer to grace my home with their snowy sparkle and winter whimsy.
I would have loved to have had the time to share this sweet little tutorial earlier in the season, but the holidays were busy (as they always are). Now that things have slowed down, this may be, perhaps the best time of all to fix yourself a mug of cocoa or coffee and enjoy the process of creating a vintage style paper mache snowman at your leisure. He is sure to bring smiles to all that behold him, all winter long!
 |
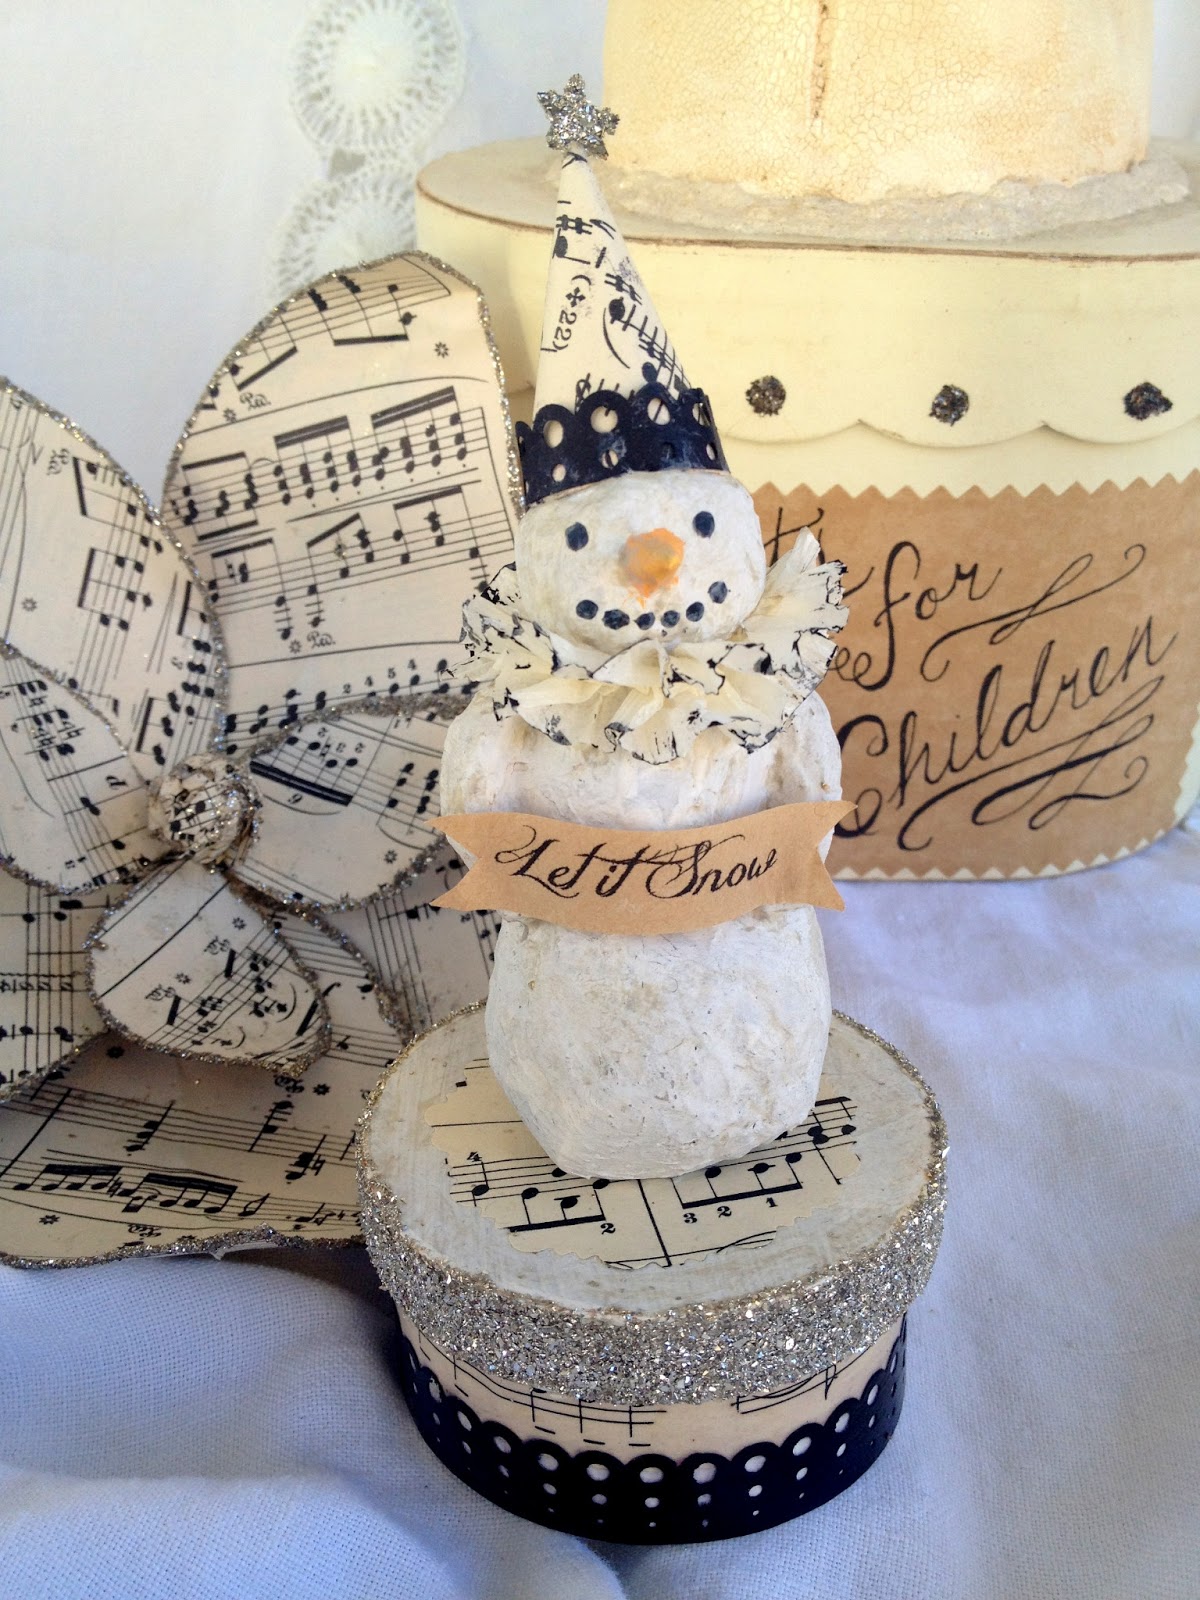
This is the snowman that my 7-year old made. The real stick arms were her wonderful idea!
|
This is a fun project to do with children as well. The process is very simple, versatile, and inexpensive. The frame for the figure is made from aluminum foil which can be worked into the shape of characters for any occasion. I'm looking forward to sharing my bunny and chick figures for Easter. The foil frame is covered with tissue paper and glue, then is sealed with a texture medium. Painting and adding decorative details are my favorite part!
Here are step-by-step instructions for how to make paper mache folk art characters of your own:
Paper Mache Folk Art Snowman Tutorial

- Aluminum Foil
- Tissue paper or Newspaper
- Hot Glue Gun
- Bamboo skewer
- School glue, Mod Podge or Paper Mache paste
- Optional, but highly recommended DecoArt Dimensional Effects
- Paint brushes
- Acrylic Paint
To decorate (ideas)
- Scrap paper
- Glitter
- Tacky glue
- Crepe paper
- A small box
Step 1: Start by making three compact balls of foil, in descending sizes. When satisfied with the size and shape, use glue gun to glue together. Press bottom firmly on an even surface to create a level bottom on which the figure may stand.
Step 2: Create any features that you desire, such as arms, nose, etc, out of foil and hot glue in place.
 |
| If you forget a feature (as I did above), you can always add them after your paper mache has dried. This is a very forgiving medium. |
Step 3: Insert a bamboo skewer into the bottom ball of foil. This will make it easier for you to handle the piece as you paper mache and paint.
Step 4: Paper mache by painting a small area of your piece with school glue, mod podge, or paper mache paste. Cover are with a small scrap of tissue paper or newspaper. Brush over with glue. Continue all over entire piece until finished. Set aside to dry (approximately 30 minutes, depending on temperature and humidity of environment). Skewer can be stuck in a tall jar or vase so that air circulates around the piece while it is drying.
Step 5: This step is optional, but highly recommended. The Dimensional Effects Texture Paste from DecoArt serves several purposes: 1) It creates a smooth, professional-looking surface, 2) provides a protective water-tight seal, 3) can be used to fill in any cracks or imperfections. To apply, brush on Dimensional Effects as you would a thick paint. It goes on white, but will dry clear. Place skewer back in a tall jar or vase and allow the figure to dry (4-12 hours depending on temperature and humidity). I like to let my figure dry overnight.
 |
| I used tacky glue to attach most of the adornments, like the hat, because it adheres quickly, but allows for repositioning, unlike hot glue. |
Step 6: Now it's time to decorate! Begin by painting the figure a base color. I used "Warm White" from DecoArt. Next, paint the features and allow to dry. For a more antiqued look, I used DecoArt Americana staining medium, mixed with a little bit of light brown paint. I brushed it on, then wiped it off with a lint-free cloth.
 |
| This photo illustrates some of the paints that I used in the project |
Step 7: If attaching your figure to a box, paint and decorate the box. Remove the figure from the skewer and attach to the lid of the box with hot glue.
 |
| I used a box from the paper crafting aisle at Michael's (purchased for less than $1). |
To make the ruffled collar, I used off-white crepe paper streamer, gathered with a needle and thread, then folded in half to form a double ruffle. I attached it with tacky glue, then highlighted the edges with black acrylic paint.
I used some vintage sheet music to make the hat and to decorate the box. For the glittered rim of the box, I brushed the rim with tacky glue, then rolled it in German glass glitter. I created the tiny star on top of the hat in the same way. I printed the "Let it Snow" message from my computer, using the "Jellyka Delicious Cake" font.