The New Year is a great time to make new goals and to reflect on your dreams for the future. AND New Year's Eve is a perfect time to start a new tradition!
As part of the Elmer's Glue n' Glitter group through Social Fabric, I was given the opportunity to come up with an inexpensive, fun and meaningful tradition to share with friends and family on New Year's Eve. I was inspired by my friend Barbara, who told me, last year, how she writes down her hopes, wishes and dreams for the coming year and places them in a special box -- to be opened for reflection mid-year, or on the following New Year's Eve. I loved the idea and stowed it away in my memory to share with my family this December 31.
The New Year in a Can
By upcycling a soup can with some scrapbook paper and my free printable label, you can share this tradition with your family and friends too. They're inexpensive, easy, and quick to make so you can make a whole batch to give as favors at your New Year's Eve Party.
Tutorial
(Instructions are broken down for one can)
Here is a label, updated for 2014.
Click, download, size to fit your can and print.
Here is a label with blanks for updating the year:
 |
| Download and print the lid label on cardstock |
 |
1 26 oz. can Campbell'soup (I prepared the soup, then froze it in individual containers), lid removed with a Safety Can Opener (below), label removed and sterilized. |
 |
|
A Safety Can Opener (Picked up mine at Walmart for less than $10) This is a great kitchen tool to invest in. It removes the lids from cans safely and easily -- no sharp edges. The best part is that the lid can be replaced after it's been removed. |
|
 |
2 sheets scrapbook paper (I used the gold and silver glitter paper from
the Colorbok Neutral Specialty Pack at Walmart ($5 for 10 assorted
sheets). |
TOOLS:
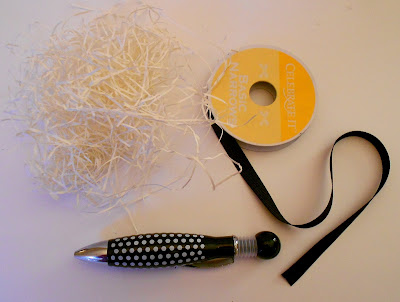 |
Decorative paper shred, a 20" piece of 3/8" black ribbon (I like grosgrain) and a nice pen. |
|
STEP 1: Cut an 11" x 5" strip from the paper you chose for the background on the can.
STEP 2: Completely cover the entire back side of the paper with the EXTRA STRENGTH glue stick. Wrap around can and hold in place for 1 minute, or until the paper adheres completely.
STEP 3: Print and trim the label. The right and left sides of the image will not come out on the print job, but this is intentional. Trim tightly around all four borders, so that the image comes together when wrapped. Completely cover the entire back side of the label with EXTRA STRENGTH glue stick. Wrap around the can and bring ends evenly together.
STEP 4: Use your compass or circle cutter to cut a 3.25" circle from the scrapbook paper you choose for the lid. Use the Extra Strength Glue stick to adhere the circle to the top of the lid. Circle will slightly overlap the edges. Use a finger to smooth the paper up the sides of the rim of the lid for a finished look. Trim the clockface from the label download sheet and glue in place as pictured above.
STEP 5: Prepare the strips by using the metal ruler, X-ACTO knife and cutting mat to cut the second sheet of scrapbook paper into TEN 12" x 1/2" strips. Then, cut strips in half with the scissors.
STEP 6: Bundle the strips by wrapping with a small piece of scrap paper and adhering the end of the strip with glue stick.
STEP 7: Fill the can with decorative shred (I probably would have used black or silver if I had any around), the packet of paper strips, and a nice pen. Set lid in place with 12 o'clock at the top, when the can label is facing you.
STEP 8: Cut out the cardstock clockface. Use the X-ACTO craft knife to cut slits vertically in the white section of the clock at 3 and 9 o'clock, so that the ribbon can pass easily through. Thread ribbon through the slits so that clock is in the middle of ribbon.
STEP 9: Set the cardstock clockface so that it's centered on top of the can. Wrap ribbon around to the bottom of the can. Holding lid and ribbon in place, flip the can over. Put a small dab of glue on one side of the ribbon, then overlap the other piece. If using regular glue (rather than hot glue), use a piece of tape to hold the ribbon in place while the glue dries.
STEP 10: Turn can upright and you're done! Share with friends and have fun coming up with your hopes, dreams and wishes for the New Year!
Here are three of mine that are going in to the can:
"Spend more family time"
"Go on a vacation"
"Savor"
What are yours?
Happy New Year, friends!
------------------------------------------------
This project has been compensated as part of a social shopper insights study for Elmer's #gluenglitter #collectivebias #CBias ” Although I was paid to write this post, my love of Elmer's/X-ACTO products is genuine. All opinions are my own, and paid or not, you'll always find Elmer's/X-ACTO products on my craft table.