Chonky Boys: The Chocolate Chip Cookie Ice Cream Sandwiches that Scream Summer!

Image
Featuring my thick and nuggy Chonky Boy Chocolate Chip Cookies, these ice cream sandwiches are the stuff that summer dreams are made of.  If you've ever had the Cookie Ice Cream Sandwich at Disneyland , you are going to LOVE these!  These big and bold chocolate chip cookies are based on a recipe from my culinary school studies at Auguste Escoffier, but with a few modifications to give them that Jennuine touch.  They make the perfectas book for a fat slice of real vanilla bean ice cream.  And those mini chips?  You just gotta have that extra cronch! Thank goodness this recipe only makes 8 sandwiches, otherwise I would be eating them for breakfast lunch and dinner.  This way, my big family can help save me from my inner child diet-saboteur.   Print With Image Without Image Chonky Boy Chocolate Chip Cookie Ice Cream Sandwiches Yield: 8 Author: Jenn Erickson Loaded with chocolate chips and buttery, brown-sugary vanilla flavor, these mall-sized cookies form a perfect partnership with a
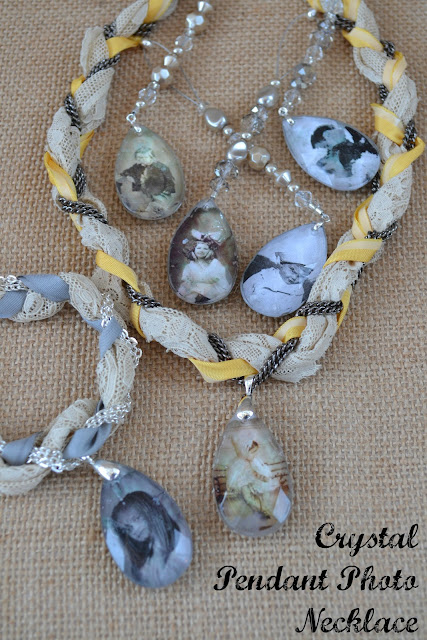
Wear Your History ~ Crystal Family Photo Pendant Necklace Tutorial


A few weeks ago I shared my tutorial for how to make personalized family photo ornaments using chandelier crystals and Mod Podge Dimensional Magic.  At the same time that I made the ornaments, I turned two of the pendants into vintage-style necklaces.  Each necklace featured a photo of one of my girls.  The necklaces are easy and inexpensive to make and are a wonderful way to carry someone you love close to your heart.

  
Crystal Pendant Photo Necklace

  • 1 crystal photo pendant (tutorial HERE)
  • 1 bail
  • 3 strands of chain, 24" long/ea
  • 1 24" piece of silk ribbon or vintage binding
  • 1 24" piece of ivory lace (I used a vintage piece that was 2 3/4" wide
  • 3-in-one jewelry pliers
  • 2 8mm open jump rings 
  • 2 4" pieces jewelry wire (thin enough for two strands to fit through your crimp beads.
  • 2 filigree bead caps or bead cones
  • 2 crimp beads
  • 1 toggle clasp
  • 2 crimp bead covers (optional)

Step 1:  Attach the bail to the pendant by inserting either end of the bail into the hole in the top of the pendant.


Step 2:   Open one of the jump rings slide one end of all three chains on.  Use pliers to close the jump ring.


Step 3:  Thread ribbon and lace through the jump ring.  Knot just above the jump ring, then trim.

Step 4:  Braid the chain (acting as a single strand), ribbon and lace, half way down.  When you reach the middle, loop the pendant onto the chain.  Continue braiding till approx. 1/2" remains.  

Step 5:  Repeat step 2 with the open end.


Step 6:  To attach the toggle, first slide one of the 4" wires up through the jump ring on one side of the strand.  Bring both ends of the wire up through a bead cap or cone to conceal the knotted ribbon.  You may wish to add a small dab of glue inside the cap.

Step 7:  Thread both wires through a crimp bead.  Thread both wires through the loop of one end of the toggle clasp.  Bring the wires back down through the crimp bead to create a tight loop.  Adjust so that toggle piece is close to the bead cap.  Crimp the crimp bead in place with pliers.  Trim excess wire.  Cover crimp bead with a crimp bead cover for a finished look.

Step 8:  Repeat process with the opposite side of the necklace and toggle clasp partner piece.


Popular posts from this blog

Nostalgia Food: Old Fashioned Apple Hand Pies

Garlic Toast Points with Marbled Beet Chevre and Edible Flowers

How to Host a Game of CLUE Party for Kids
+ Printable/Customizeable Invitations