|
| Here's my Restoration Hardware knock-off: $25 |
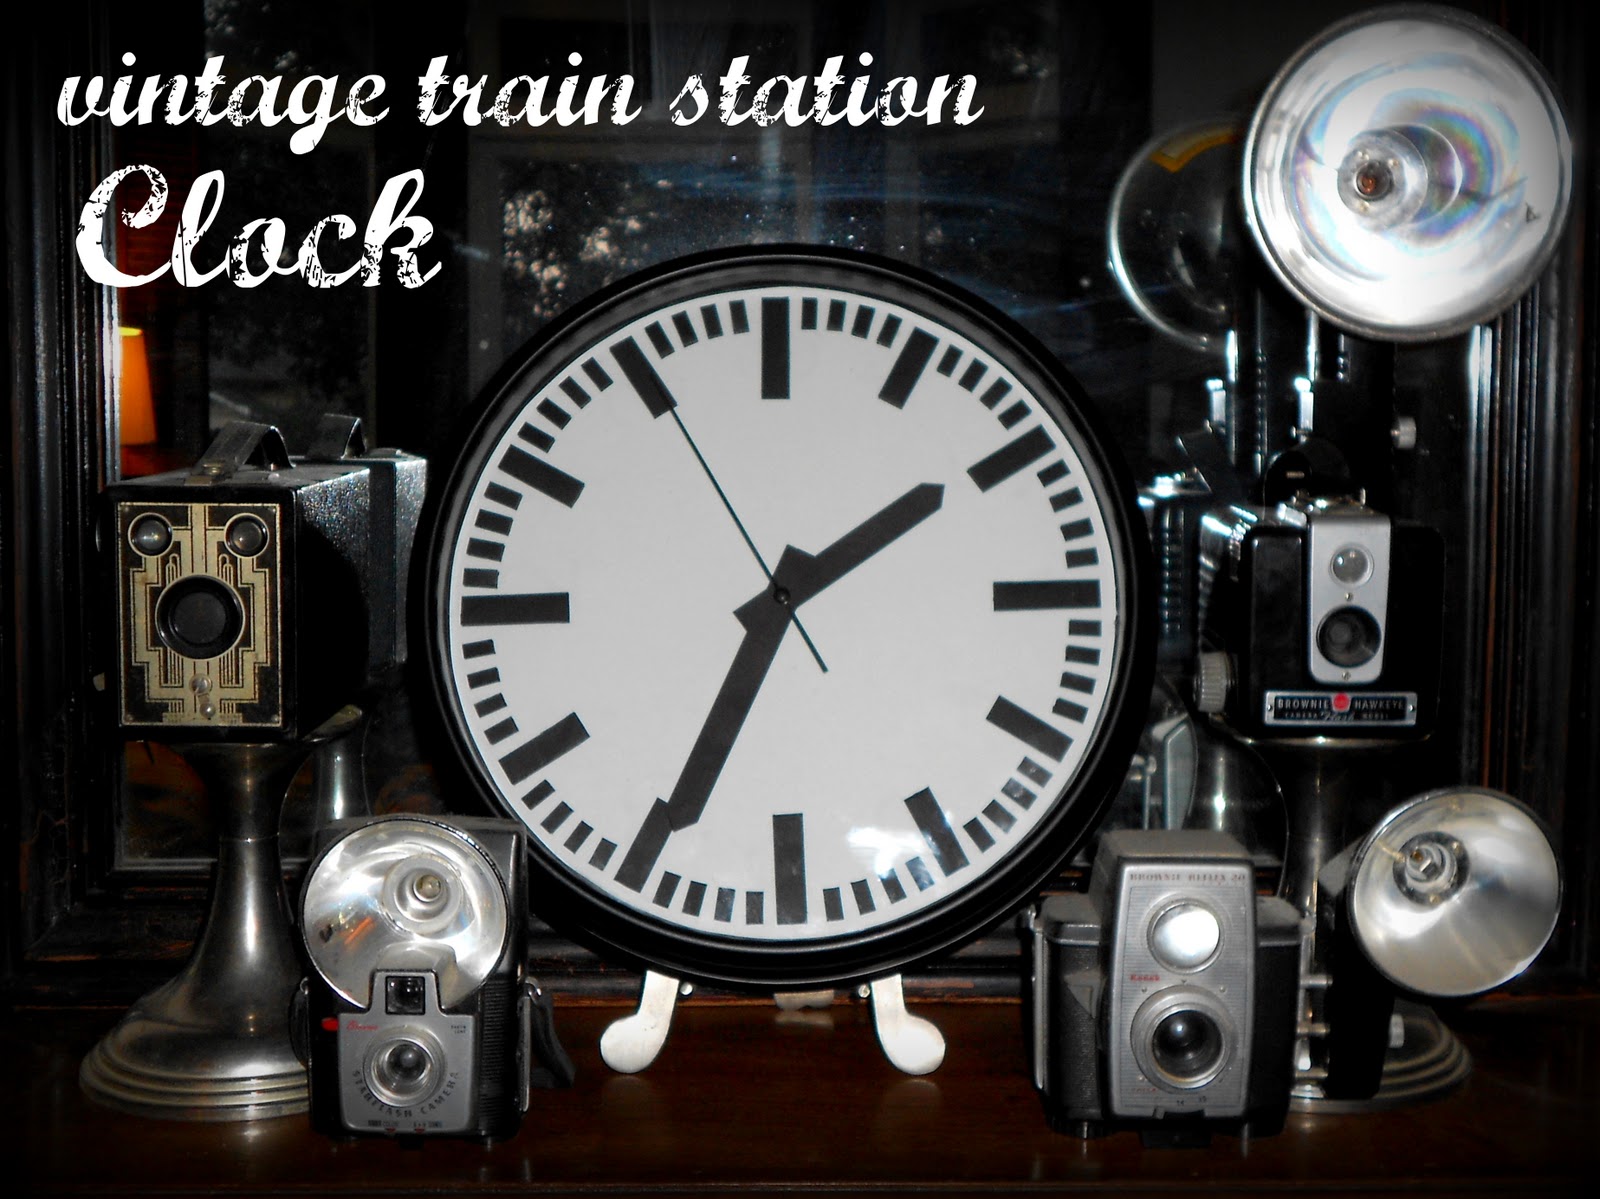
As I confess in my profile, I'm a nostalgist, vintage junkie and an Anglophile to boot. So when I saw the Metro Lighted Train Station Clock (a reproduction of the clocks that once lighted the bustling train stations of 1940s Britain) in the Restoration Hardware catalog, it was love at first sight. But at $995, the love affair didn't last long.
 |
| Here's the one in the catalog...$995 |
So, when Elmer's asked me to participate in their LOOKS FOR LESS CHALLENGE, I knew just what I'd do to "reproduce a retail-quality item using Elmer's and X-ACTO products while making the most of my decorating dollar."
Using an inexpensive wall clock ($16), Elmer's black-on-black foam board, my X-ACTO Gripster knife, and my trusty Craft Bond adhesives, I was able to create my own version of the Metro Train Station Clock for less than $25. My version doesn't light up. It doesn't come with a removeable base for tabletop display, but I found a little easel that works just fine. For a $970 savings, I'm not complaining.
I am thankful to
Elmer's for sending me all the supplies I needed make this reproduction wish a reality. I couldn't have asked for a better sponsor for this project. I know that I can always count on Elmer's and X-ACTO products to perform exactly the way they're supposed to -- with excellence! For more amazing ideas on how to get designer looks on a dime with products you can count on, visit the
Looks for Less Guide!
------------------------------------------
Here's how to make a Vintage Train Station Clock of your very own:
VINTAGE TRAIN STATION CLOCK
Total Cost: Around $25
Total Time: Approx. 1 Hour
You'll need to purchase:
An inexpensive 12"-face wall clock in a black frame
(I purchased the "Room Essentials" clock for $15.79 from Target)
(you'll only need a small amount, so you'll have a lot leftover for other projects)
Sheet of White Poster Paper (99-cents)
Sheet of Black card stock (50-cents)
Elmer's CraftBond Thin Mini Glue Spots
(approx. $4 for the whole box, but you'll use about 10-cent's worth)
AA Battery ($1)
From your craft stash
A small bowl
Ruler or metal straightedge
Small Phillips screwdriver
Compass w/pencil
Single Whole Punch
Scissors
(I love the 8" Stainless Steel Designer Series from X-ACTO)
Black paint (spray or acrylic)
Step 1: Remove clock from box and dismantle by using a screwdriver to remove the screws from the back that hold the frame to the face. Set screws aside in a small bowl. Gently remove the frame and glass and set aside. Then, remove the second-hand by gently lifting it up by its center pin. Use spray paint or acrylic paint to paint it black. Next, remove the minute-hand by gently lifting it off the threaded center piece. Set aside. Now remove the hour-hand and set aside. Last you'll need to unscrew a small nut and remove the washer below. The battery compartment should now slip right off the backside of the clock. Set all the pieces you've removed in a small bowl.
Step 2: Set your compass to 5 3/4" and draw a circle on the white poster board. Use scissors to carefully cut along the pencil line.
Step 3: Liberally apply CraftBond Extra Strengh Glue Stick* to the entire side of the poster board (on the side with the pencil marks). Position the poster board circle, glue side down over the clock face. Press in to place.
*Why this particular adhesive? The CraftBond glue stick is my honest preference because it is makes the item being glued re-positionable, but has incredible sticking and staying power once it's dry. I've learned the hard way by using cheap glue sticks that seem to evaporate in mid-air and adhesives that bond too quickly.
Step 4: Use your ruler (I used a 16" metal model) and X-ACTO to cut the hours and minutes from the foam board. (Don't be tempted to use cheap foam board. The Elmer's cuts beautifully and with the precision necessary for this project.) Here are the measurements and quantities for each:
Minutes: Forty-eight 1/2" x 1/16" pieces
Hours (12 o'clock, 3 o'clock, 6 o'clock, 9 o'clock): Four 1 3/4" x 1/2" pieces
Hours (1 o'clock, 2 o'clock, 4 o'clock, 5 o'clock, 7 o'clock, 8 o'clock, 10 o'clock, eleven o'clock): Eight 1 1/2" x 1/2" pieces
Step 5: Liberally apply CraftBond Extra Strength Glue Stick* to the back of one of the large hour pieces. Put in place at the 12 o'clock spot. You should be able to see through the poster board just enough to use it as a guide. Repeat with the 3 o'clock, 6 o'clock, and 9 o'clock.
Step 6: Repeat procedure with the small size hour pieces.
Step 7: Finally, set the minute pieces in place.
Step 8: Prepare the hands by using a ruler, pencil and scissors to get two 1/2" strips from the black card stock. You'll need the hour hand to be 4 1/4" inches long and the minute-hand to be 5 1/4" inches long. Notch one end of each so that they come to a point. Determine where to make a hole punch, by laying the corresponding metal hand on the paper one (centered, as shown in the photo below). Use a pencil to indicate where there is a hole. Then remove metal hand and punch a hole in the paper. Now, place a row of CraftBond mini glue dots up and down an entire metal hand. Set the corresponding paper hand in place, lining up the holes. Repeat with the other hand. Lastly, you will need to trim the metal hands. This can be done easily with a pair of sharp scissors. Trim so that they are slightly shorter than the paper hands.


Step 9: Turn the clock over. Use your X-ACTO knife to carve out the opening for the battery and hand assembly. Insert the threaded mechanism through the hole and fit the battery compartment back into place. Hold it in place as you flip the clock back over and replace the washer and screw the nut back on.
Step 10: Snap the hour-hand back in to place. Snap the minute-hand in place on top of it. Put the second-hand back in to place. Insert a battery into the battery pack to make sure the clock is functioning properly. If hands are bumping in to the raised "numerals", you can bend them slightly upward so that they have proper clearance.
Step 11: Put the glass back in to place, then the frame. Hold the frame to the base as you gently flip it all over. Re-insert and tighten the screws.
Step 12: Mount on a wall or display on a shelf or mantle. To display on an easel, you'll want to make a solid back piece for clock, by cutting a 12" circle of black foam board and adhering it to the raised areas of the back of the clock with more glue dots.
Enjoy!
It may not light-up, but with the $970 you saved, you can go buy yourself a nice lamp!
-----------------------------
This post has been shared with