Posts

Showing posts with the label EASTER1

Chonky Boys: The Chocolate Chip Cookie Ice Cream Sandwiches that Scream Summer!

Image
Featuring my thick and nuggy Chonky Boy Chocolate Chip Cookies, these ice cream sandwiches are the stuff that summer dreams are made of.  If you've ever had the Cookie Ice Cream Sandwich at Disneyland , you are going to LOVE these!  These big and bold chocolate chip cookies are based on a recipe from my culinary school studies at Auguste Escoffier, but with a few modifications to give them that Jennuine touch.  They make the perfectas book for a fat slice of real vanilla bean ice cream.  And those mini chips?  You just gotta have that extra cronch! Thank goodness this recipe only makes 8 sandwiches, otherwise I would be eating them for breakfast lunch and dinner.  This way, my big family can help save me from my inner child diet-saboteur.   Print With Image Without Image Chonky Boy Chocolate Chip Cookie Ice Cream Sandwiches Yield: 8 Author: Jenn Erickson Loaded with chocolate chips and buttery, brown-sugary vanilla flavor, these mall-sized cookies form a perfect partnership with a

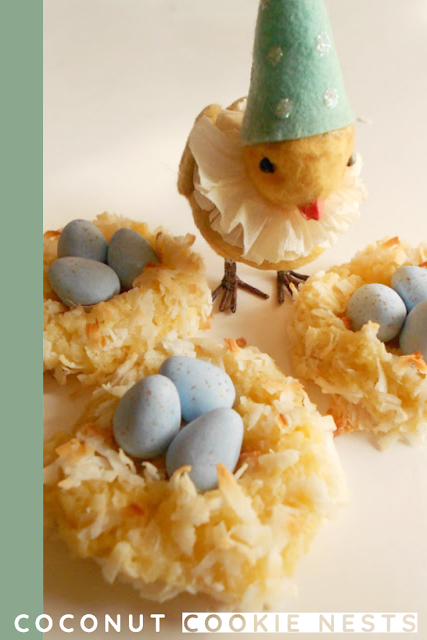
The Cutest Easter Cookies: Coconut Cream Cheese Cookie Nests

Image
This delicious little recipe combines a classic Easter candy ~ Cadbury Mini Eggs ~ with my all-time most popular recipe --  The Macaroon Kiss .   The buttery, cream cheese dough is rolled in coconut, then baked.  While still warm, simply nestle three little chocolate eggs inside.   Print With Image Without Image Coconut Cream Cheese Cookie Nests Yield: 48 cookies Author: Jenn Erickson This is a rich, tender and buttery little cookie with toasted coconut and the best Easter candy EVER! Ingredients: 2 1/2 cups All purpose flour 1 Tablespoon plus 1 teaspoon baking powder 1/2 teaspoon table salt 2/3 cups butter, softened 6 oz. cream cheese, softened 1 1/2 cups granulated sugar 2 large egg yolks 1 Tablespoon plus 1 teaspoon Vanilla extract 1 Tablespoon plus 1 teaspoon juice from a fresh orange 10 cups sweetened flaked coconut, divided in to 6 cup and 4 cup portions Cadbury Mini Eggs (2 10oz. bags) Instructions: In a medium b

Marshmallow Cottontail Peeps on a Stick -- Sweet, Simple & Fun Easter Recipe

Image
Here comes Peter Cottontail Hopping down the Bunny Trail Hippity, Hoppity Easter's on its way Two of my favorite and most nostalgic Easter sweets are chocolate covered marshmallow bunnies and Peeps ® .   So, my girls and I decided to combine the two classics, resulting in: COTTONTAILS ON A STICK These sweet bunny silhouettes are so simple to make and taste incredible! Here's all you need: Marshmallow Peeps ®  Bunnies Lollipop Sticks  (found in the cake decorating aisle of most craft stores) Candy melts, bark or tempered Couverture Chocolate Mini marshmallows Step 1:  Line a baking sheet or tray with wax paper (no need to use expensive parchment) Step 2:  Prep your Peeps ®  by inserting a stick as far as it will go without coming up through the ears. Step 3:  Prep mini marshmallows by trimming off 1/3 with scissors.  Keep the larger pieces and discard the trimmings. Step 4:  Melt your chocolate. Step

DIY: Silhouette Easter Eggs

Image
I love the charm and old fashioned elegance of the silhouette. For this year's Easter eggs I decided to stray from the usual palette of pastel & polka-dotted whimsy; opting instead to play off the natural alabaster of the eggshell with a sharp contrast of elegant black. The wonderful thing about this technique is that it doesn't require special transfer paper or expensive equipment.    If you have some white tissue paper, Mod Podge, a glue stick and a printer, you can make Silhouette Easter Eggs without spending a penny! Silhouette Easter Eggs Materials Eggs (hard boiled if you plan to eat them, or blown if you want to keep them) White tissue paper (ironed flat if it's wrinkly) Silhouette images (I used the beautiful free images from The Graphics Fairy ) A sheet of copy paper A glue stick (I like the Elmer's Craft Bond Repositionable) Scissors Mod Podge Paint brush An old gift card or club card to use as a refi

DIY: Pressed Flower Easter Egg Tutorial

Image
After the fun I had last year adhering elegant Silhouettes to Easter eggs, I felt inspired to try embellishing my eggs with a different paper-thin medium this year.  What could be more naturally lovely and simple than pressed flowers?  These beautiful eggs require only three materials:  eggs, pressed flowers and Mod Podge.   Lacking the patience to press my own flowers, I sent away for a sample pack of pressed blossoms from Greetings of Grace .  After a bit of trial and error, I determined that the thinner the flower, the easier they are to adhere.  Try to avoid flowers, like daisies, that have thick centers.  Here are some of the types of flowers that work best:  pansies, verbenas , violas, hydrangeas and forget me nots. Each egg can hold 6-8 blossoms, although I liked the way that the single chrysanthemum on the stem turned out.  The pressed flowers can be purchased in packages and end up costing only a few pennies each.   Ready to make some?  Let

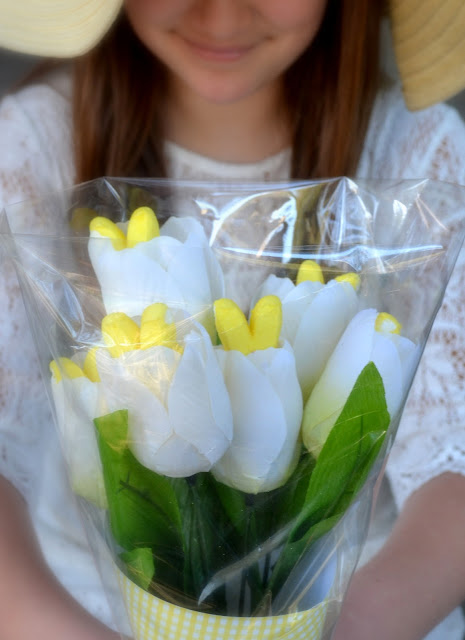
Everything's Coming Up {PEEPS} Bunnies Bouquet ~ A Dollar Store DIY

Image
I'm so excited to share this sweet little Easter craft! It's easy, inexpensive, and scrumptiously charming! Inside each silky tulip blossom is a soft and sweet marshmallow bunny. You can find almost everything you need at your local dollar store (except the Peeps themselves).   Each bouquet takes only a few minutes to make. Everything's Coming Up Bunnies Bouquet Time:  approx. 5 minutes Cost:  approx. $3/bouquet Materials Marshmallow Bunny PEEPS (7-8 per bouquet) 1 bunch silk tulips (I found pink, purple, white and yellow at my local Dollar Tree) 1 sheet scrapbook paper per/bouquet clear cellophane scissors transparent tape 4 round toothpicks, broken in half   Step 1:  Insert a toothpick half, p ointed end down, into the center of each flower.  T IP:  I found it best to try to insert the toothpick in the hole in the center that attaches the blossom to the stem.  Avoid displacing the stem by inserting

How to Make Lavender Egg-Shaped Soaps
By Reurposing Plastic Easter Eggs

Image
Chances are, if you celebrated Easter this past week, you probably have a dozen or more of those colorful plastic eggs lying around.  So, what to do with those empty plastic shells once the last jellybean has jumped and the last peep has popped into your mouth? Last April I came up with this simple little tutorial for making lovely egg-shaped soaps with the help of plastic Easter eggs.  Even the packaging is made from upcycled materials. I shared the tutorial in a guest post at My Repurposed Life .  Today, I'm sharing it here on Rook No. 17!  How to Make   Egg Shaped Soaps from Plastic Easter Eggs   Materials Pour & Mold Soap (2 pounds will yield 1 dozen egg soaps) Essential Oil for scent -- optional Cardboard Egg Carton Acrylic craft paint & paint brush Small funnel* (typically available at craft stores) Drill with a 7/32 bit and a 11/32 bit Piece of scrap wood Plastic Easter Eggs Gorilla Tape & scissors Bamboo skewer