Chonky Boys: The Chocolate Chip Cookie Ice Cream Sandwiches that Scream Summer!

Image
Featuring my thick and nuggy Chonky Boy Chocolate Chip Cookies, these ice cream sandwiches are the stuff that summer dreams are made of.  If you've ever had the Cookie Ice Cream Sandwich at Disneyland , you are going to LOVE these!  These big and bold chocolate chip cookies are based on a recipe from my culinary school studies at Auguste Escoffier, but with a few modifications to give them that Jennuine touch.  They make the perfectas book for a fat slice of real vanilla bean ice cream.  And those mini chips?  You just gotta have that extra cronch! Thank goodness this recipe only makes 8 sandwiches, otherwise I would be eating them for breakfast lunch and dinner.  This way, my big family can help save me from my inner child diet-saboteur.   Print With Image Without Image Chonky Boy Chocolate Chip Cookie Ice Cream Sandwiches Yield: 8 Author: Jenn Erickson Loaded with chocolate chips and buttery, brown-sugary vanilla flavor, these mall-sized cookies form a perfect partnership with a

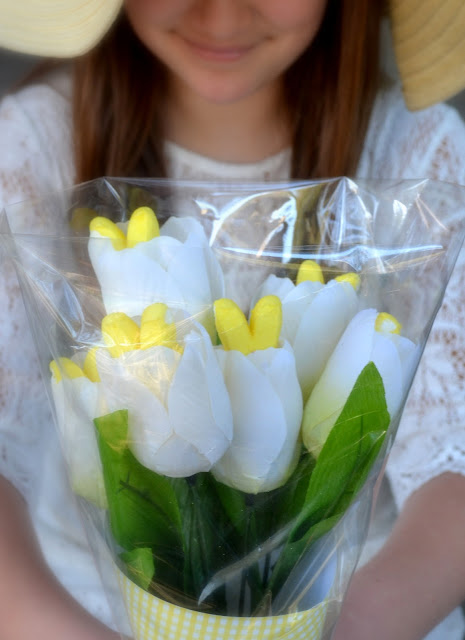
Everything's Coming Up {PEEPS} Bunnies Bouquet ~ A Dollar Store DIY


I'm so excited to share this sweet little Easter craft!


It's easy,
inexpensive,
and scrumptiously charming!


Inside each silky tulip blossom
is a soft and sweet marshmallow bunny.


You can find almost everything you need at your local dollar store (except the Peeps themselves).  
Each bouquet takes only a few minutes to make.


Everything's Coming Up Bunnies Bouquet
Time:  approx. 5 minutes
Cost:  approx. $3/bouquet

Materials
  • Marshmallow Bunny PEEPS (7-8 per bouquet)
  • 1 bunch silk tulips (I found pink, purple, white and yellow at my local Dollar Tree)
  • 1 sheet scrapbook paper per/bouquet
  • clear cellophane
  • scissors
  • transparent tape
  • 4 round toothpicks, broken in half


Step 1:  Insert a toothpick half, pointed end down, into the center of each flower.  TIP:  I found it best to try to insert the toothpick in the hole in the center that attaches the blossom to the stem.  Avoid displacing the stem by inserting the stick next to, rather than on top of, the stem.  It's a tight fit, but is sturdy this way.


Step 2:  Insert a marshmallow PEEP bunny in top of the toothpick.  This will hold it in place.  Straighten out any petals or stamens that were displaced during the process.  Repeat with remaining bunnies and blossoms.


Step 3:   Roll a paper cone out of coordinating scrapbook paper.  Use a piece of transparent tape to seal the edges.  Insert bouquet.


Step 4:  Roll bouquet in a sheet of cellophane.  Seal edges with a piece of transparent tape.


Enjoy!


------------------------
This post has been linked-up with:
The Crafty Soiree @ Yesterday on Tuesday
BFF Open House @ The Answer is Chocolate 
SITS Sharefest 
The Hoppity Easter Craft Party @ Sew-Licious 
Countdown to Spring party @ Domestically Speaking 
The Easter Flash Craft-Off @ Craft Quickies
The Spring Fling Party from Flamingo Toes & Homework   
The Spring Hop hosted by:   Buns in my Oven, Eats at Home, Hoosier Homemade, MomAdvice, Nest of Posies, Positively Splendid, The Pennington Point, and WhipperBerry.
Easter Week @ A Girl & a Glue Glun


AND featured on Dollar Store Crafts


Popular posts from this blog

Vintage Folk Art Style Paper Mache Snowman Tutorial

Recipe: New World German Brown Bread -- "Squaw Bread"

Vintage Style Folk Art Black Cat Halloween Bucket
(made from a $1 plastic pumpkin)