Chonky Boys: The Chocolate Chip Cookie Ice Cream Sandwiches that Scream Summer!

Image
Featuring my thick and nuggy Chonky Boy Chocolate Chip Cookies, these ice cream sandwiches are the stuff that summer dreams are made of.  If you've ever had the Cookie Ice Cream Sandwich at Disneyland , you are going to LOVE these!  These big and bold chocolate chip cookies are based on a recipe from my culinary school studies at Auguste Escoffier, but with a few modifications to give them that Jennuine touch.  They make the perfectas book for a fat slice of real vanilla bean ice cream.  And those mini chips?  You just gotta have that extra cronch! Thank goodness this recipe only makes 8 sandwiches, otherwise I would be eating them for breakfast lunch and dinner.  This way, my big family can help save me from my inner child diet-saboteur.   Print With Image Without Image Chonky Boy Chocolate Chip Cookie Ice Cream Sandwiches Yield: 8 Author: Jenn Erickson Loaded with chocolate chips and buttery, brown-sugary vanilla flavor, these mall-sized cookies form a perfect partnership with a

Vintage Style: 1930s Velvet Shamrock Pin Tutorial

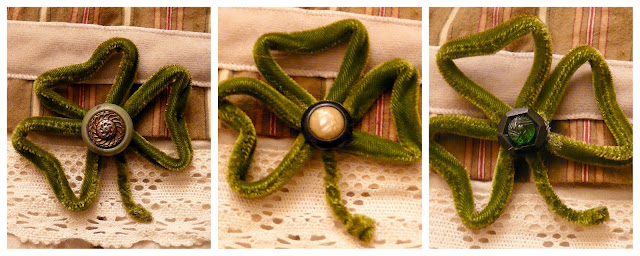
velvet tubing shamrock pin
This week my mind is focused on studying for the CSET in order to start student-teaching in the fall.  So, to keep the creativity and merriment going here while I revisit ancient Mesopotamia, navigate through mitochondrial DNA, and tango with the Pythagorean Theorem, I've dusted off a simple little St. Patty's Day project from the Rook No. 17 archives.
velvet tubing shamrock pin

These very chic and charming little shamrock pins look just like them came out of a fancy millinery shop from the 1930s.
Grab some buttons, glue, wire and velvet tubing and let's go...

velvet tubing shamrock pin tutorial

Velvet Shamrock Pins
  • 18" Velvet Tubing (a.k.a. piping or cord) per pin 
  • 18 " of 22 gage floral wire
  • pretty buttons
  • hot glue gun
  • pin backs
  • Optional:  Fabric rosettes made from scrap fabric or lace

Step 1:  Remove the cord from inside the length of tubing.
 
Step 2:  Insert wire into tubing, and seal tubing at both ends with a small dot of hot glue. 
Step 3:  Use three fingers, as shown in photo below, to bend three loops in the wired tubing.
Step 4:  Use a small dab of hot glue to connect the three loops at the base.
Step 5:  Using your forefinger and thumb, stretch each loop to widen at the top.
Step 6:  Twist "stem" several turns to tighten the grain.
Step 7:  Glue a vintage button in the center of shamrock.  I layered two buttons.
Step 8:  Bend each petal in the center.

st. patrick's day jewelry diy
Step 9:  At this point you can embellish further by mounting the velvet shamrocks on a fabric or vintage lace rosette, or leave them as a simple outline as pictured above.  Use a dab of hot glue to affix a pinback to the back of the shamrock and it's ready to wear.


For this rosette, I used a 10" strip of frayed muslin, gather stitched.


------------------------
This post has been entered in the:


Popular posts from this blog

Nostalgia Food: Old Fashioned Apple Hand Pies

Win the Perfect Holiday Dress from Shabby Apple

How to Host a Game of CLUE Party for Kids
+ Printable/Customizeable Invitations