I'm so happy to be welcoming Laura Barker, the owner of Pink Flamingo Ephemera on Etsy, to Rook No. 17 today. For scrappers, crafters and lovers of all things vintage, Pink Flamingo is an incredible online resource for unique vintage paper ephemera.
 |
| Here's a peek at some of my favorite items for sale at Pink Flamingo. |
I've been as busy as a bee crafting with a fabulous pack of ephemera that Laura sent my way, and I look forward to posting a fun project soon. But today, Laura is the star of the show. She's put together an easy, elegant Easter project that upcycles scraps of paper into charming Easter Egg greeting cards.
To make these adorable Easter cards, Laura used the pages from a vintage book. You could do the same, or play with variations on the theme with materials like sheet music, scrapbook paper, newspapers, or paint chips.
Ready to get started?
Here's Laura's step-by-step tutorial:
Vintage Paper Easter Egg Card
Materials
- paper in two different colours (I used some colourful vintage book pages)
- a piece of card
- glue
- ½ inch circle punch
- 1 inch circle punch
- black fine liner pen
- scissors
- foam sticky pads
- a card blank (I’ve used one measuring 10.5cm x 15cm)
- an Easter greeting
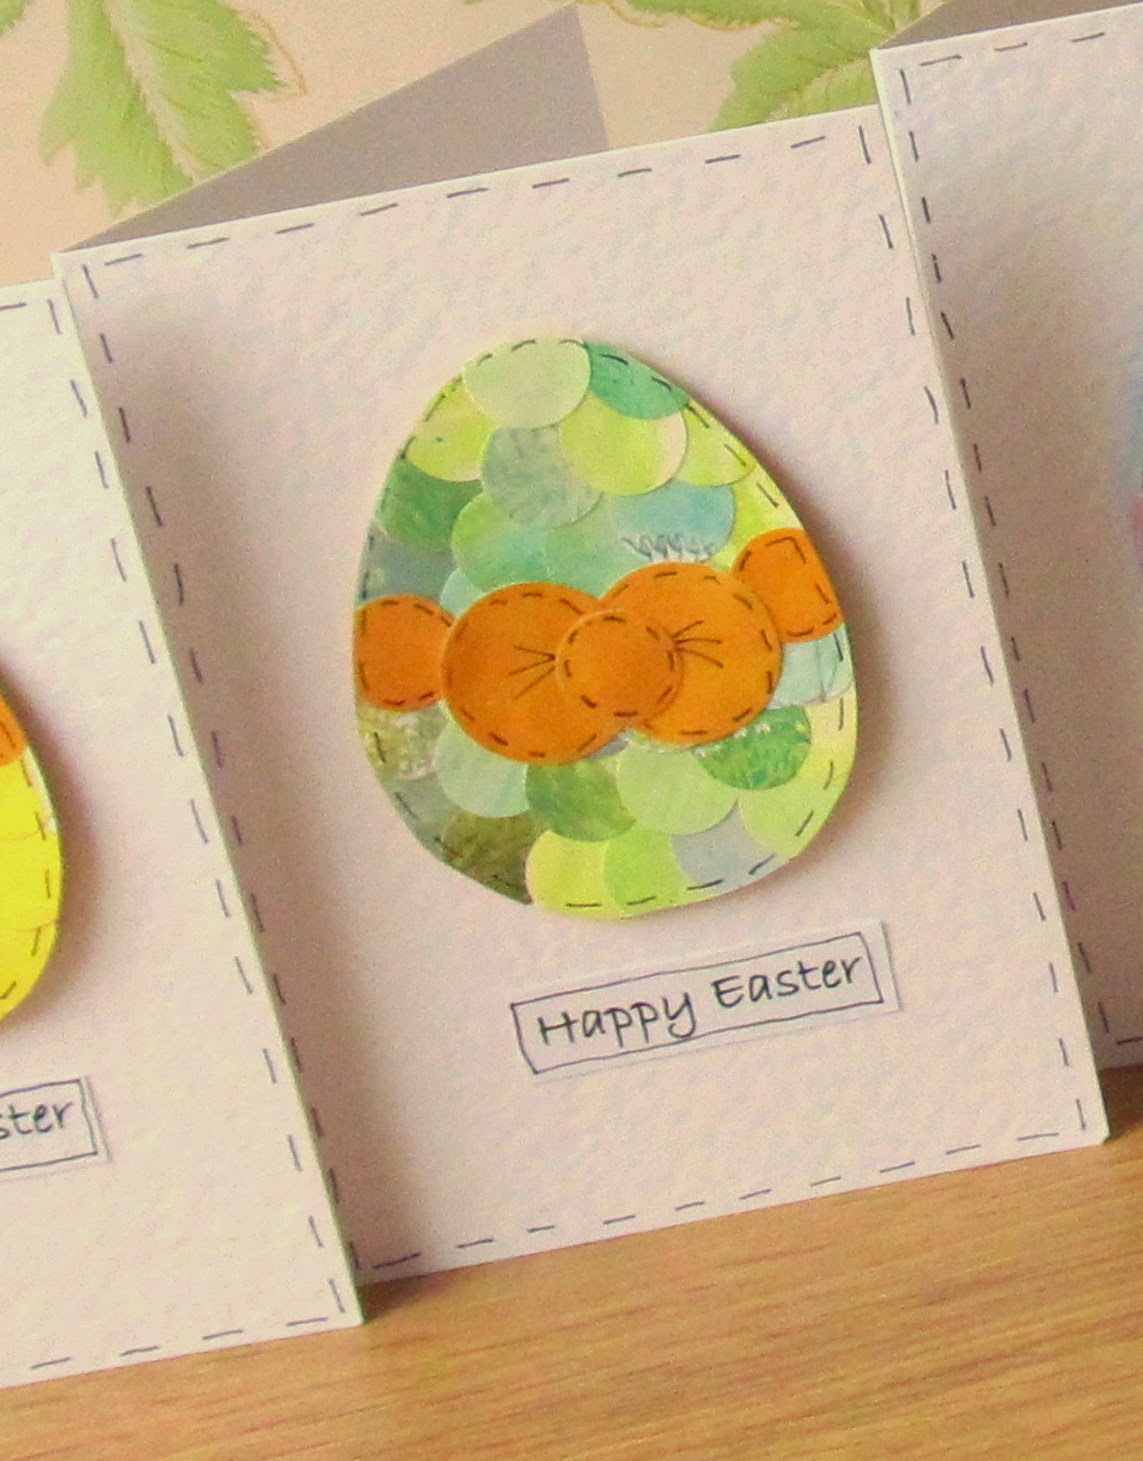
Step 1: Draw an egg shape on the piece of card and cut it out. There are free templates available online if you need help. The egg shape I’ve used is 6.5cm x 8cm.
Step 2: Use the ½ inch paper punch to make some circles with the coloured paper you want as the egg. You’ll need about 40 circles. Choose the colour of the ‘ribbon’ on the egg. Punch 3 small ½ inch circles and 2 larger 1 inch circles from this colour.
Step 3: Take one of the ½ inch circles and spread glue on the back. Stick it in the bottom left hand corner of the card egg cut out in step 1. Make sure it overlaps the edges of the card. Stick some more circles in a row overlapping each with the next until the bottom of the egg is covered.
Step 4: Now stick the circles in a row above the first one, again overlapping each circle with the next and the ones in the row below. Keep building rows working your way up the egg until the whole thing is covered.
Step 5: Turn the egg over so the paper overlapping the edges can be seen. Use scissors to follow the shape of the egg and cut away excess paper.
Step 6: Turn the egg back so the coloured side is facing you. Take the circles of the ‘ribbon’ colour paper. Glue the back of one circle and stick it on the left hand side in the middle. Do the same on the right hand side. Glue another small circle and stick it overlapping but a little lower than the first on each side.
Step 7: Take the two 1 inch circles. Glue the back of one of them and place it overlapping the last smaller circle on the left. Do the same with the other larger circle sticking it on the right side of the egg. Stick the remaining smaller circle in the middle of the two bigger circles.
Step 8: Turn the egg over again and trim any excess paper from the ‘ribbon’ edges.
Step 9: Take a fine liner pen and draw stitch marks around the outside of the egg.
Step 10: Make the same stitch marks along the ribbon and bow as shown in the picture.
Step 11: Turn the egg over. On the back stick some foam pads spread out over the egg.
Step 12: Draw the stitch marks around the edge of the card blank. Remove the backing from the foam pads and stick the egg in the middle of the card just up from centre. Add a greeting of your choice below the egg.
------------------------------------
Thank's Laura!