(photo modified from the original taken by SS)
A few weeks ago I stumbled upon a blog called Diamonds for Dessert and was immediately captivated by the creativity and charm of the recipes there. The one recipe I positively couldn't get out of my mind was the incredibly original and beautifully written tutorial for making a pie that looks like a pirate ship -- A Pie-rate Ship! Brilliant!
Not having any little buccaneers with impending birthdays in my crew, I immediately began to daydream about the other occasions I could serve a ship-shaped pie! I first imagined a fleet of Spanish sailing ships ~ The Nina, The Pinta and The Santa Maria for Columbus Day. Unfortunately, Columbus Day had just passed. I had literally missed the boat! "Not to worry," I told myself, "Thanksgiving is just around the corner." Suffice to say, it was a little too close around the corner, and sadly I've spent the last few days nursing a head cold rather than preparing for the maiden voyage of my "Mayflour".
Nevertheless, I am so thrilled that Susan, the creative gal behind Diamonds for Dessert is visiting here at Rook No. 17 in her first ever guest post, and is sharing her ingenious pie project. Whether you're of the pirate persuasion, celebrating an American holiday, or simply want to wish a very special bon voyage to your favorite fruit, I hope you'll give Susan's recipe a try. So without further ado, join me in welcoming:
Susan of
Diamonds for Dessert
Hi everyone! This is Susan, the blogger at the baking blog Diamonds for Dessert. I'm a college student studying Biology and French with too many interests: crafts, baking, fashion, science, painting, and languages, just to name a few.
Diamonds for Dessert is where I post about a mix of recipes: my favorite go-to recipes, like Thick and Chewy CCCs, desserts centered around a theme, like Glee Cookies or the Sorting Hat Bread (Harry Potter!!!), and ordinary recipes that I put creative twists on, like Stained Sunglasses Cookies or Turtle Melon Pan.
I love that baking combines my two great passions: art and science. The creativity in baking lies in using unusual or exotic ingredients or in the way the final dessert is styled. But in addition, the baking process is also like a science experiment, very precise in measurements, with interesting chemical reactions in each step.
Back in May, when summer was still around the corner, I made this pie, an example of one of those recipe twists I mentioned in my intro. First, let me go off on a bit of a tangent. Two things I associate with summer are apple pie and the beach. Apple pie because of the 4th of July. And the beach because the idea of just lying out in the sand enjoying the sun just screams summer. The beach makes me think of the ocean... the sea, which makes me think of pirates...
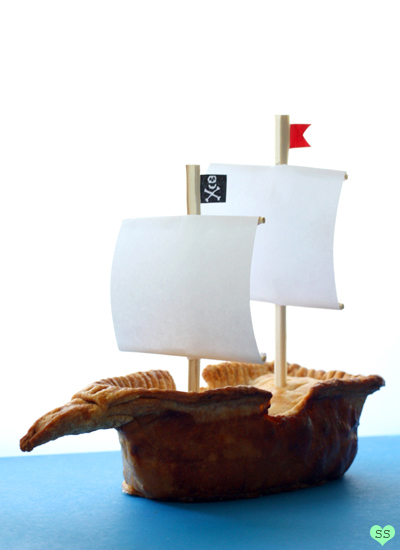
...Which finally gets me to the point of my post: an APPLE PIE-rate ship (yes, I love puns). I was thinking about how I always see interestingly shaped cakes out there, but rarely do I see pies that look like anything but pies. Thus, I decided to bake a pie that wasn't the typical round pie. Apple Pie...Pie... 3.1415... Pi... Pirate! Yup, a pirate ship shaped apple pie. (By the way, the pie above was not burnt, just weird photo lighting :P).
At the store, I searched for a baking vessel for my plan and settled on some mini loaf pans. I modified my pans with a bit of foil and I baked my pies (I prefer applying a lil creativity to ordinary affordable baking tools, like loaf pans, rather than purchasing specialty pans that can only be used for one purpose, like a castle pan). After the pies cooled, I had a little arts and crafts session as I constructed the sails out of chopsticks, bamboo skewers, and a piece of paper. Once the masts were inserted, my pirate ship pies were complete.
P.S. Please don't be alarmed at how long the recipe looks. I just wanted to ensure that my explanations on how the pie is constructed are very clear, better too detailed than too vague.
Makes 2 pie ships.
2 1/2 cups flour
1/2 t salt
1/2 cup shortening
1/2 cup ice water
nonstick spray
4 apples (I used granny smith and braeburn)
6 T sugar
3/4 T flour
1/2 t cinnamon
1/4 t salt
a pinch of nutmeg
1 egg
pie weights, dried beans, or dried rice
coffee filters or parchment paper
2 aluminum mini loaf pans (5 x 2.5 inches)
2 pairs of disposable chopsticks
3 bamboo skewers
foil
tape
black and red marker
glue gun
In a bowl, combine the flour and salt, and mix. Cut the shortening into small pieces and add them into the bowl. Use a pastry cutter or a fork to incorporate the shortening until there are pea sized lumps. Add the ice water one tablespoon at a time, gently mixing it in, letting it moisten the dough. Gather the dough into a ball and split it in two. Place each half on a piece of plastic wrap. Flatten each into a disc, fold over the plastic wrap, and chill in the fridge for 30 minutes.
While waiting, prepare the apples. Peel and core the apples. Thinly slice them and then chop the slices into thirds. Place the apples pieces in a mixing bowl. Add the sugar, salt, flour, cinnamon, and nutmeg. Gently mix. Cover the mixture with plastic wrap until ready to use.
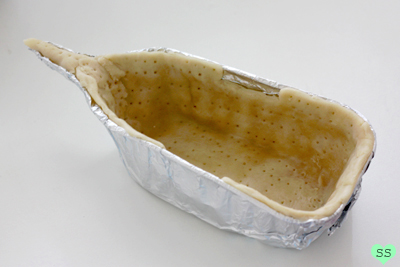
Preparing the Pans
For the two mini loaf pans, grab the center of one of the smaller sides and pull it out so it makes a point. so now instead of rectangles, the pans have 3 of the original sides and a little pointy side. Take a large piece of foil and wrap it around one of the pans, using it to extend the short pointy side to make a longer point. Fold the excess foil over the other pan edges. Spray both pans with nonstick spray.
Preheat the oven to 425°F. Take one disc of dough and place it between two large pieces of plastic wrap. Roll it out to a 12x10 inch rectangle. Peel off a piece of plastic wrap and cut the dough rectangle into two pieces, one that's 9x10 inches and another that's 3x10 inches (refrigerate the 3x10 inch piece).
Shaping the Crusts

Bottom Crust
Take the 9x10 inch rectangle and place it into the prepared mini loaf pan and stretch it to fit the mold. Trim the overhanging dough with kitchen shears. (If desired, in the center of the longer edges, a little notch of dough can be cut off for aesthetic purposes, to make the ship more "ship-like" in appearance). Repeat all of this with the other disc of dough and mini loaf pan. Take a fork and poke holes all over the doughs to prevent bumps forming in the crust when baking.
Spray two coffee filters with nonstick spray and place them on the dough in the pans (or two pieces of parchment paper can be used instead); this keeps the pie weights from touching the dough and will make it easier to take them out. Fill the pans with the pie weights or dried beans or dried rice. Place the two filled pans on a baking sheet and then place the sheet in the oven for 15 minutes. When done, take the sheet out of the oven and let the crusts cool.
Top Crust
Once cool, take the apple filling and spoon it into the two crusts, filling to about 1/4 inch from the top of the crust. Take the 3x10 inch pieces of pie dough out from the fridge and place them onto the crusts. Seal the dough by pinching around the top 1/4 inch of the crust. Trim the excess overhanging dough. Then take a fork and press it around the crust edge to make sure that it's firmly sealed. Take a knife and cut slits in the dough for vent holes. Mix the egg with 1 teaspoon of water to create an egg wash and brush the tops of the pies. Then place them in the oven on the baking sheet for 10 minutes.
After 10 minutes, lower the oven temperature to 350°F and continue baking for 35 minutes. If the pointy part of the "ship" or the edges start to brown too much, rip off small pieces of foil and cover them. Once done, take the pies out of the oven to let them cool. When completely cool, carefully remove the pies from the aluminum pans.
Preheat the oven to 425°F. Cover a baking sheet with parchment paper and place the pies on the sheet. Take the rest of the egg wash and brush the pie sides with it. Cover the top of the pies and the pointy part of the "ships" with foil. Bake the pies for 15 minutes. Check and see if the sides are dry and golden brown. If so, take the pies out of the oven and let cool. If not, continue baking them until the sides are dry and golden brown. Then remove from the oven and let cool.
Adding the Sails

Take a bamboo skewer and poke two holes in the pie: one hole 1/3 from the one end of the pie and the other hole from the other end of the pie. Enlarge the holes with the skewer so they're big enough to fit the chopsticks.
To make the masts, split the chopstick pairs. Carefully break two chopsticks so that they are 7 inches long and the other two so that they are 6 inches long, and cut off any loose splinters. Carefully cut the skewers so you have eight 3 inch pieces. Hot glue one bamboo skewer piece 1 inch from the top of the chopstick and glue the other piece 3 inches from the top of the chopstick, both skewer pieces should be perpendicular to the chopstick.
For the sails, cut out 3x3 inch squares from the piece of white paper. Fold a little bit at the top and the bottom of each square. Cut out a little notch in the center of the parts that were just folded. Now take the four sails and attach them to the bamboo skewers by wrapping the top and bottom folded parts around the skewers and taping them down, with the chopstick fitting into the notches that were cut.
For the flags, cut out four 3/4x1/2 inch rectangles from the piece of white paper. Fold a little tab on one of the shorter sides of each rectangle (this will make it easier to tape the flags on the chopstick later). On two of them, draw skull and crossbones and color them black. Color the other two red and cut out a triangle from one of the shorter sides. Tape the flags to the tops of the chopsticks by taping the folded tabs to chopstick. Now stick the finished masts into the pies.