We've been talking a lot about school lunches lately at Rook No. 17. On Wednesday, I shared an idea for a LUNCH LAUNCH PARTY designed to help parents find new foods that their kids will eat. On Facebook, I've shared recipes and resources for healthy school lunch menu ideas.
Today, we turn to an idea that's healthy for the planet. Did you know, that "Of the millions of plastic snack and sandwich bags that are produced, more than 90% are thrown away. " (Reuseit.com). Furthermore, "The average American school-age child throws away 67 pounds of lunch waste a year. With the population of kids in the US alone accounting for over 70 million, that’s over 4.6 billion pounds of waste that could be easily avoided. (EPA)"
Cecily of Craftopotamus is here today to share her tutorial for Reusable Sandwich Bags and thereby help us reduce our carbon footprint. Take it away Cec...
------------------------------------
Hi there! I'm Cecily from Craftopotamus. My blog is all about sharing the things I dream up and make with my own two hands, from quilts to knitting, painting to crafting. I'm also a mid-career grad student with very little time on my hands so I like to dream up easy projects and this one is no exception. I am so excited to be sharing my Reusable Sandwich Bags with you here at Rook No. 17!
I had wanted to make something like these for a while. The thing is, once I started looking at ideas and researching fabric possibilities, it all got kind of complicated. The pattern, not so much, but you would not believe all the controversy out there over which fabrics should or should not touch your food. I am not going to make you suffer through the hours I spent reading these bitter online discussions. Instead, I'll give you a link to the one site that seemed to sum them all up and from there you can make your own choices, like I did.
I went with cotton prints for the outside and rip-stop nylon for the inside (with the shiny, coated side away from the food).
But I also sort of made up my own pattern just like I always do. I knew I did not want velcro closure on them like the majority of the ones sold out there have. Why you ask?
Picture this: there's a 36 year old woman sitting in a class room with maybe 20 other students, 90% of which are about 24 or so and none of which have children or had to get up a some ridiculous hour so they could commute 2 hours to get to class in the first place. This woman decides to reach into her bag and pull out a snack to try and keep her brain functioning for the duration of the 3 hours she needs to sit there. Do you think she is going to rip open a super loud velcro sandwich bag, thereby attracting all sorts of unwanted attention? Or do you think she will sit there for the next 2 hours thinking about the food in that bag and how it is so close, but just out of reach?
Right. No velcro.
First I tried using buttons and a hair tie to make a closure. That worked in theory, but not in practice. The bags just wouldn't have stayed closed unless they were totally full. So then I realized that they really didn't need to "seal," they just needed to keep the food in not let in much air.
So I just made it like a regular, pre-ziploc, totally old-school, fold over sandwich bag. And it works. Perfectly.
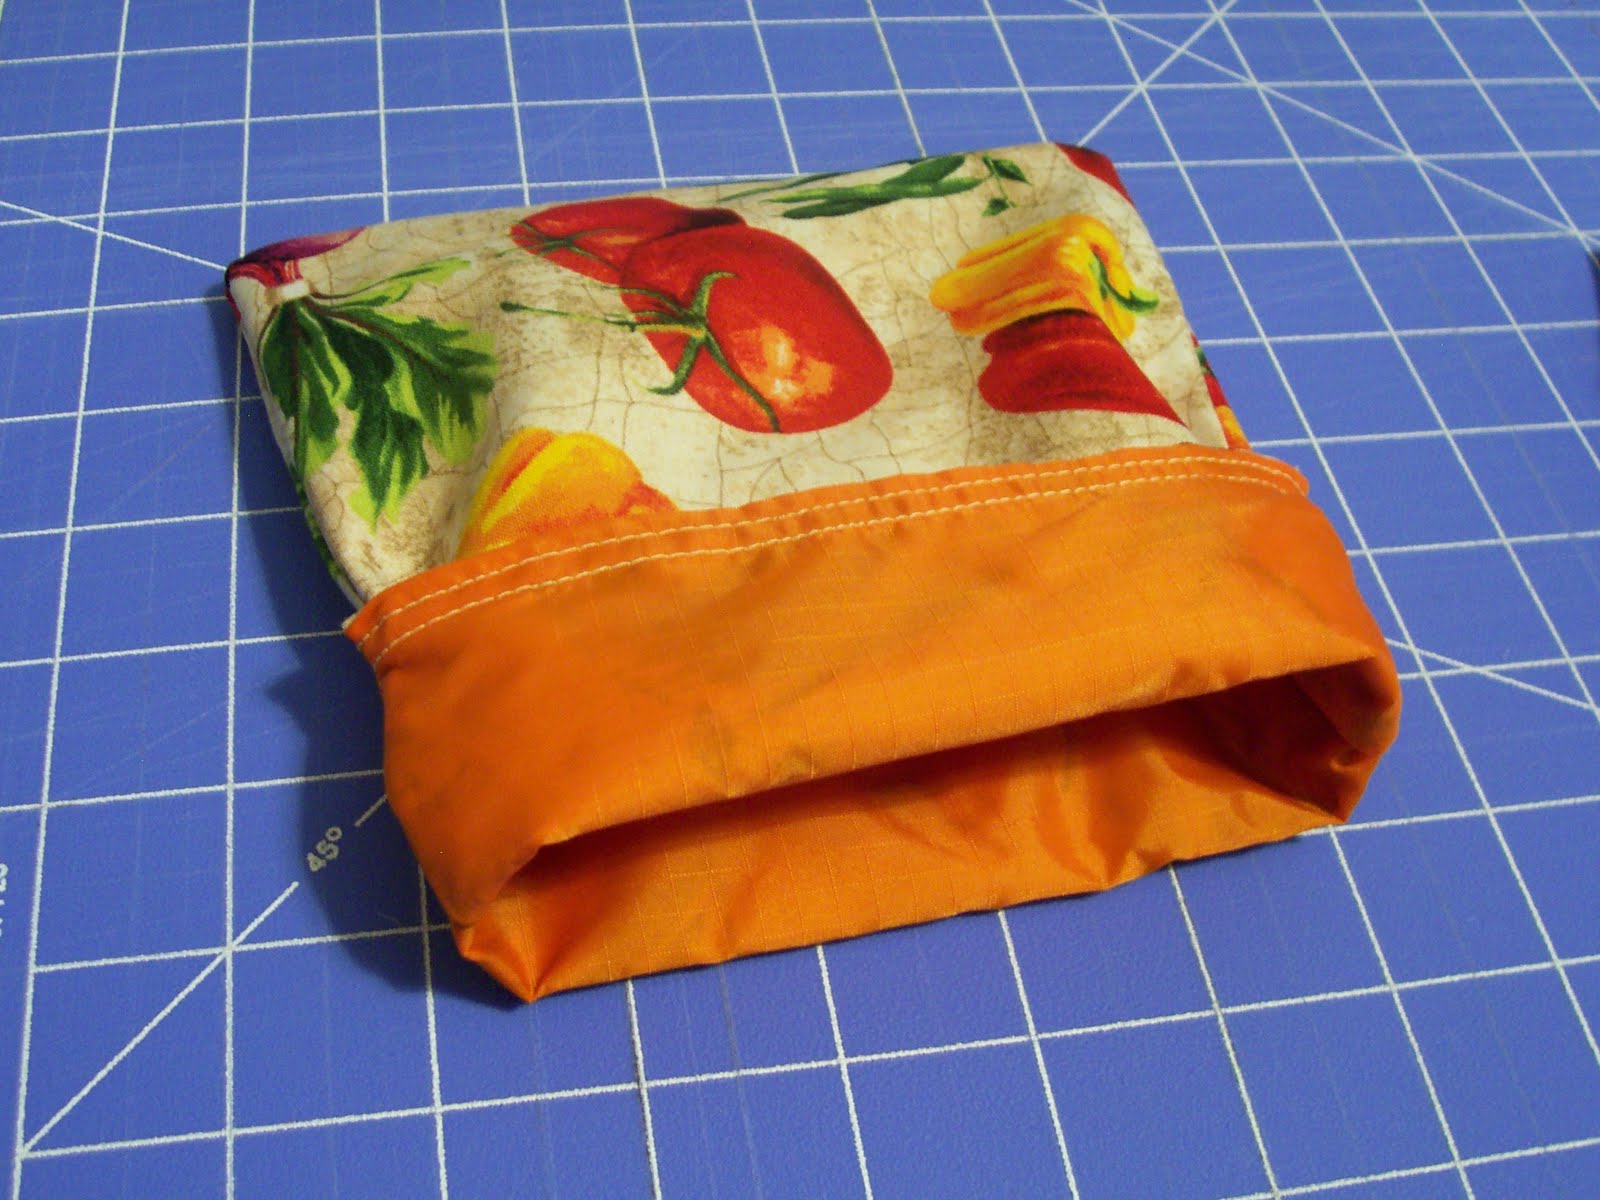
Here is one of the bags with the top folded open. You just fold it back over itself to close.
All I did was cut 2 pieces of the cotton fabric and 2 of the rip-stop nylon at 7" x 8.5". With right sides facing and a quarter inch seam (I am a quilter, y'all), I sewed around both long edges and one short edge (basically making a pocket). I clipped the corners. Then I turned the nylon pocket so that the "inside" part was now facing out and inserted it into the cotton pocket (so the right sides of both were together). I aligned the top edge and sewed around it, again with a quarter inch seam, leaving a couple inches open to turn the fabric. I then turned the fabrics and realigned the nylon pocket inside of the cotton one. Then I topstitched twice along the top edge of the bag. The last step is to fold the top of your pocket down, roughly about 2 inches (I eye-balled it every time) and stitch the edges down as close to the edges of the pocket as possible.
It's a little tricky trying to figure out which side of the nylon is the coated side. It's the side that is shinier. With the black fabric it was fairly obvious, but I could only tell with the orange fabric when it was held to sunlight. You can also feel a difference between the two sides (the coated side feels more like plastic, while the uncoated side feels like fabric).
By the way, these are really easy to clean and maintain. I usually just turn them inside out and throw them in the washing machine. You can dry them in the dryer too, but avoid fabric softener. I know some people put them (again, inside out) in the top rack of the dishwasher. For less messy stuff you can just wipe them out with a damp cloth.
Great for back to school and you can make them with any fabric that gets your kids excited about them. I hope you make a bunch!


