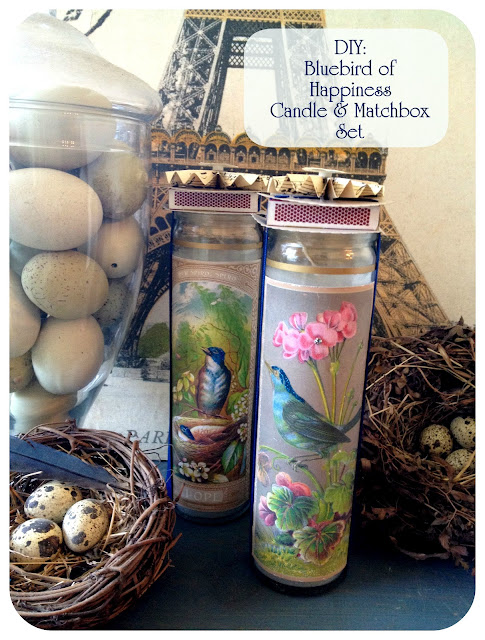
It's amazing what you can create with so little when you have the right tools.
Take for example these lovely vintage-inspired candles made with inexpensive candles, paper, and a regular matchbox. The candles can be purchased at most grocery, dollar and and super stores for less than $1.50. They can burn for days and are easy to embellish with a handmade touch -- making them the perfect little last-minute gift to keep on hand.
It all comes down to having the right tools in your crafting arsenal. I'm talking about tools that are easy to use, dependable, and work with precision. That's what I love about the EKSuccess Tools.
Ready to get started?
Bluebird of Happiness Candle & Matchbox Set
- 1 devotional candle
- 1 piece of photo or high quality paper
- Bluebird of Happiness label (free download HERE)*
- Spray adhesive or glue stick
- One small rhinestone
- 2 4"x4" squares cardstock or heavy watercolor paper
- 1 3"x6" piece of scrapbook paper or sheet music
- 24" Ribbon (in a complimentary color)
- E-6000 or other heavy duty glue for the rhinestone
- Gold dual tip marker, archival quality
- Retractable Craft Knife
- Primary Glitter (blue)
- Small Precision Scissors (with non-stick blades)
- Precision Tip Craft Tweezers
- Decorative Scissors, scallop edge
- HERMAdotto repositionable adhesive dispenser
- 1 inch Scallop Circle Medium Punch
- 3D-Dots, foam dot circles
Step 1: Print bluebird sheet using "best" or photo-quality setting. Trim along edges with scissors. Apply glue (or spray adhesive) to the back of the trimmed image and set in place on the candle. Smooth out any air bubbles.
Step 2: Embellish the image. Use the 1.0mm gold tip to highlight areas with golden tones (like around the birds' eyes, the stamens of the flowers and veins of the leaves). Put a dab of heavy duty glue in the center of one of the flowers. Use tweezers to pick up and place a tiny rhinestone on top of the glue. Brush a small amount of glue on the areas where you would like some blue sparkle (like the birds' caps and napes), then lightly dust with glitter. Gently blow away excess glitter when the glue is dry.

Step 3: Decorate the matchbox. Use the circle template from the bird download to trace two 3" circles on heavy stock. Cut out with decorative scissors (scallop pattern). Apply repositionable adhesive to one side of the matchbox. Center matchbox on one of the scalloped circles, glue side down. Use the retractable craft knife to cut a slit along both short sides of the matchbox (slit should be slightly wider than your ribbon). Repeat with second scalloped circle on the opposite side of the matchbox.

Step 4: Thread the ribbon up through the bottom slit in the matchbox circle, through the top slot, over the top and down the slits on the opposite side. Center so that there's an equal amount of ribbon hanging from each side. Accordion fold the 3" x 6" piece of paper to make the rosette. I used the repositionable adhesive to hold together the ends. Glue in place on top of the matchbox. Use the 1" medium scallop punch to cut the small bird image from the printed sheet. Use the smallest size 3D-Dot to affix the image to the center of the paper rosette.
Step 5: Tuck the wick inside the candle. Place the finished matchbox on top of the candle like a lid, with ribbons running down each side of the label. Use a piece of tape or a dot of glue to affix the ends of the ribbon on the bottom of the candle.
* You can download the individual bird images to resize and customize HERE.
EKSuccess products are available at select Walmart stores. Keep up with the latest from EKSuccess on Facebook and projects at Spotted Canary.
This post was part part of paid campaign with EKSuccess Tools and Blueprint Social. All opinions are genuine and are my own. For more ideas for crafting with EKSucess Tools, check out the projects from some of the other participants in this campaign!
This post has been shared with:


