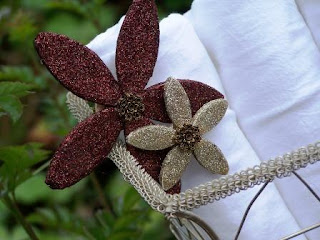
You've perhaps heard it mentioned that I have a particular weakness for glittery things. It is, in part, what inspired the name of my blog (black birds have a natural attraction to shiny objects). So, each time I visit my friend Holly's place and my eyes catch sight of one of the incredible glittered flowers she's fashioned out of simple wood pieces, I go into a sort of glitter induced trance.
Recently, Holly added some of her magnificent jewel-toned creations to her Christmas tree, and I nearly went catatonic from the glitter euphoria. Fortunately she was able to lull me back to reality with the promise of brie and some of her homemade spinach dip. But I digress...
I'm truly honored to count Holly, the amazing gal behind 504 Main, not only as a great friend and ally in the blogosphere, but as a real-life friend as well. I was thrilled when she agreed to share her Glittering Flowers tutorial here at Rook No. 17.
Without further ado, I give you Holly:
-------------------------------------------------------------
Wooo-whooo! I am so happy to be
visiting Rook No. 17!!!! Jenn is a true and fabulous friend...and crafty
genius...in real life and blog life and she has asked me to share one of my
all-time favorite creations!
So, before I continue on, I am Holly from 504
Main.
I cook, craft, and chat about all sorts of things over there. have a crazy
mixed up eclectic style and I love to make beautiful things out of the
unexpected (and the expected too!).
I pretty much love plate joining
biscuits and
the unexpected and unusual items you
can create with them.
(you get 'em at the hardware store)
You can bet your sweet patootie there
will be more
projects using these biscuits soon!
Glittering Flowers
Click {HERE} for a pdf
Supplies
* P.K. Glitz
Glitter in desired colors (or any glitter, but finer glitters and glass glitter
give a great sparkle)
* Gorilla
Wood Glue
* Plate Joining Biscuits
* 1” wood discs (or old buttons or anything flat)
* Paint brush
* Paint (Optional – this can be done w/o paint or you can
paint each biscuit for a base – spray paint works quickly and well)
* “Centers” for flowers – beads, buttons {shank works
extremely well}, gems – your choice.
* (Optional) felt and floral wire
DIY IT!
1. Each flower takes 5 petals (biscuits) and one disc (you
can use just about any round, flat item for the center. I have used button and
brass key tags too).If you are going to use these as ornaments, you should
decide how you want to hang them now. Skip to step 9 to see your options. If
you choose option C, you need to pre-drill a small hole now.*
2. Paint Gorilla Wood Glue all over the top and sides of
each biscuit. {OPTIONAL: prior to glittering, you may chose to paint the entire
biscuit - and wood disc a similar color to the glitter color}. For ornaments I
glittered both sides of my flower.
3. Douse each petal in the desired color of P.K. Glitz
glitter. Use a coffee filter to catch the excess glitter - so easy to slide the
excess back into the jar!
4. Set aside and let dry.
5. When dry, take one 1” disc and paint glue all over the
top.
6. Lay your petals out on top of the disc – only the tips
will be on the disc and glued to it. Once these set, I like to drop a drop of
glue into the center – it spread and solidifies the hold. Let dry.
7. Attach center – gems, pearl, crystals, buttons – it all
depends on the look you want. Shank buttons work really well, as the shank sets
in the glue.
ALTERNATIVE: I have not tried this yet, but depending on
your desired application, you can also apply the petals directly to some felt -
that is or can be cut around the shapes.
8. Once completely dry – NOTE: THESE FLOWERS ARE STILL
FRAGILE EVEN WHEN DRY – you can cut some floral wire and attach it to the back
using the glue – cut a small piece of felt to sandwich the wire. (You may need
to touch up in some areas)
9. To make them an ornament, either:
A. Put a generous dollop of hot glue on the back of the
disk and settle an ornament hook right into it (the very easy method)
B. Do the same as A, but add a circle of felt to cover the
hot glue/ornament from behind.
*C. Drill a small hole in one of the petals and string a
ribbon or desired hanger through it.
Use the flowers
to decorate wreaths, baskets, branches. They are gorgeous glittering goodness -
perfect for Fall!
It is still one of my favorites!
Read all about it {HERE} and get a link to a pdf tutorial.
Thanks Jenn for letting me visit!
Happy Holidays everyone!


