Did I make you giggle? I can hardly say the name without a smile and
a giggle. Dolly Dingle is the chubby-cheeked creation of illustrator Grace Drayton, who also gave us the famous
Campbell’s Soup Kids. She created Dolly
Dingle as a series of paper dolls that were published in the Pictorial Review from 1913 and through
the Great Depression. I came across my
first set of Dolly Dingle paper dolls in an antique store in Santa Rosa,
California, around ten years ago and
have been smitten with Dolly, her dog Fido, Cat Kitty-Cutie, and their cast of
friends dressed in various period and international costumes ever since.


I count my friend Holly among my life's many blessings, and it was further proof of our status as “kindred spirits”
when I visited her home and found that she had made an adorable set of magnetic
paper dolls made from the 1923 “Dolly Dingle and Sammy Smart Help Teacher” set. Dolly Dingle Paper Doll collections always
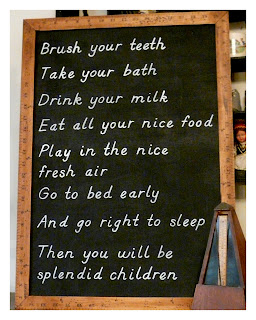
include little props and accessories, and this one happens to include a
blackboard with the most charming little saying about how to “be splendid
children”. As I admired her handiwork, Holly and I spontaneously chimed, “We should
make a life-size version of that blackboard!”
So our first ever tandem blog post/project was born.
To create a vintage schoolroom look, our adaptation of the Dolly Dingle blackboard features a frame fashioned out of antiqued yard sticks, and a blackboard with permanent “chalk” lettering. With this versatile project, you can make your blackboard say anything you wish.
VINTAGE INSPIRED BLACKBOARD: PART II
COMPLETE SUPPLY LIST (PARTS I AND II)
- 1 piece 1/4" plywood, luan, or other thin, yet smooth (mostly) wood, cut to size. Ours is 18" x 24"
- 3 to 4 yardsticks (about $3.00 each at office supplies store - ouch! Hardware stores also carry them and they can be found at all sorts of other random places, like thrift shops.)
- Dremel Multi-Max or saw or have the store make one cut for you
- Gorilla Wood Glue
- Gorilla Tape
- DISChanger, 4"
- Chalkboard paint, such as DecoArt Chalkboard Paint
- Paint pen, white (We used Painters opaque paint marker, white, medium tip)
- Computer print out of message in font and desired size
- Pencils
- Ruler
- Miter saw or miter box (you could do straight cuts too)
- Stain such as DecoArt Americana staining and antiquing medium mixed with Asphaltum (we used some random stains that we already have...when we checked all have been discontinued, but we feel you can achieve similar result)
- Paint
- Compass, awl, etc. - for beating up the frame!
Step 1: Lightly sand your ¼” plywood rectangle to create a smooth surface for the chalkboard paint.
Step 2: Apply 1 coat chalkboard paint. Dry. Apply a second coat.
Step 3: Print your choice of wording on regular printer paper. We used the wording from the Dolly Dingle blackboard, and used the font AbcDNManuscriptLined. You can download it free HERE.
Step 4: Cut wording into strips and tape to your board to test desired layout.
Step 5: To transfer the wording on to the blackboard, we used the pencil transfer method. Start with one strip of wording. Completely shade the reverse side with a pencil.
Put the wording strip (right side up) back where you want it on the blackboard. Tape in place. Using a pencil, trace over each letter.
When you remove the paper strip, a pencil transfer of the lettering will be present on the blackboard. Repeat with entire set of wording.
Step 6: Using a white, medium tip opaque paint pen, go over the penciled letters, being sure that your pen is fully loaded with paint every time you start a new word.
Step 7: When paint has dried, you are ready to attach the blackboard to the frame. To do this, we ran a thin line of Gorilla Wood Glue around the inner border of the back of the frame, then set the blackboard in place.
Step 8: Once glue has dried, apply hanging hardware. We chose a 4” DISChanger.
Hang & Enjoy
_____________________________
This post has been linked-up with


