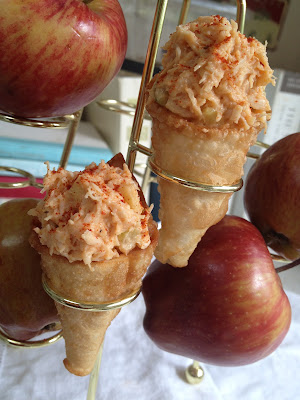
The perfect appetizer for your
Olympics Party
(or any occasion)
These savory little wonton cones are easy to make, can be prepared ahead of time, and can be filled with just about anything you'd like. They can also be rolled in cinnamon sugar for a small-bite dessert. Filled with my
Cheesecake Mousse, they're a guaranteed gold medal winner!
I filled mine with Salmon Tartare (I'll be sharing the recipe tomorrow), but I know that raw fish isn't everyone's idea of a good time.
Instead, imagine a spinach or artichoke dip, chicken or shrimp salad, or smoked salmon and creme fraiche. There are so many creative possibilities!
Here I've filled the cones with an apple chicken salad. It gets its orange color from smoked paprika. So delicious!
What would you put in
your wonton mini cones?
Wonton Mini Cone How-To
Won Ton Wraps (in the produce section of your grocery store)
Kitchen shears or scissors
Large, fresh carrots (one for every 6 cones you want to make)
You'll be using the carrots as tools to form the cones.
A small bowl of water
Used to seal the wrappers
A pot filled with 4" oil
Optional: Candy thermometer to monitor temperature of oil
Step 1: Set a stack of wonton wraps and small bowl of water by the stove. Have a cooling rack or plate lined with paper towels nearby as well. Wash and thoroughly dry carrots. Bring oil to approx. 400º F.
Step 2: Use kitchen shears to trim one side of a wonton wrap as shown above. Save the scraps. You can fry them up at the end and save them in an airtight container to use on salads and soups.
Step 3: If you've ever rolled a paper cone, you can do this -- same principle. From the same position as illustrated above, wrap top edge of wonton wrap over two fingers (the rounded edge will be facing out; the pointed end pointing to your palm). Dip one of your fingers (from your other hand) in the water and gently moisten the flap of the wrap that lies over your fingers as illustrated below.
Step 4: Bring the bottom flap up and over the moistened flap to form a cone. The water acts as a glue. Press the seam tightly and work out any air bubbles.
Step 5: Insert a carrot into the cone. Holding carrot by the top, dip cone (still on the carrot) into the hot oil so that the bottom tip of the carrot touches the bottom of the pan. I found that spinning the carrot on the tip as the wrap fries helps create a nice uniform shape.
 |
| My carrots were a little smaller than I would have liked. A carrot that is 1 ¼” wide, 2" up from the tip is a perfect size to use as a form. |
Step 6: Remove carrot (wrap will come with it) when wrap is golden brown (around 10 seconds). Make sure to tip the cone back into the pan to drain any excess oil. Remove cone from carrot and repeat with remaining wraps. I found that I can get about 6-8 cones out of each carrot before they go soft.
 |
| Invert the cone and let excess oil drip back in to the pan. |
Step 7: Use right away or store in an airtight container for up to a week. When ready to use, fill just before serving. The longer the filling sits inside the cone, the softer it will become.
Enjoy!


