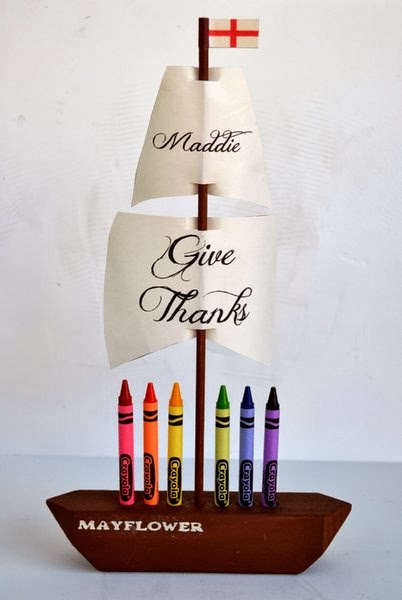
Howdy Pilgrims!
Many thanks to Crayola for inspiring and sponsoring this last-minute Thanksgiving craft!
It was so easy to put together because I already had all the Crayola supplies on hand. After all, Crayola products have been a part of my crafting repertoire ever since I was old enough to hold a crayon!
In fact, you could go so far as to say that Crayola crayons are something of a treasured heirloom in my family.
So, for the kids at this year's Thanksgiving dinner, I designed a simple project that captures the spirit of the holiday and performs many tasks -- place card, activity, and take-home gift! The sails of my Crayola Mayflower Place Cards provide the inspiration for each child to doodle and draw the things that they are most thankful for. I can't wait to see what my girls come up with!
Here's how to make a whole fleet of Crayola Mayflower Place Cards of your own:
DIY Crayola Mayflower Place Cards
(instructions are for one boat)
- One 7" length of 1 3/8" x 1 3/8" (You can buy an 8' pre-sanded Douglas Fir length for around $4 at most home improvement stores, which will yield 13 boats)
- A saw of your choice
- Sandpaper (optional)
- Ruler, pencil, scissors
- Awl (or fine tip permanent marker)
- Brown acrylic or tempera paint*
- Paint brush
- One 1/4" craft dowel
- Drill and drill bits: 3/8" for the crayon holes and 13/64" for the dowel hole
- Sail and template sheet (download HERE for free)
- Glue stick
- 6 Crayola Crayons
Step 1: Saw off both ends of the 7"-long piece of 1 3/8 at a 45-degree angle to form the basic boat shape.
Step 2: Next, you will taper each end by clipping the corners at 45-degree angles.
Step 3: Sand any rough edges (optional). Then, print out the template on plain paper. Cut out the hole template. Center on the top of the wood block. Use an awl (or a permanent marker) to mark the center of each circle.
Step 4: Remove template. Put the 3/8" bit in your drill. (We used a piece of tape, 1" up on the bit to mark where we want to stop drilling, so that all the holes are the same depth.) Drill all but the middle hole. Use the 13/64" bit to drill the center hole.
Step 5: Sand the holes (optional). Insert the dowel in the center hole. Paint the boat and mast with brown paint.
 |
| The Crayola Quality Watercolor Series 1127 #12 is my all-time favorite multi-purpose paint brush. This brush is a powerhouse! It is easy to use, clean, and is long-lasting. This is a must-have in every crafter's collection. |
Step 6: Personalize the sails, then print out on a medium stock, off-white paper. Trim the sails (pun intended). Fold sails in half, then make a small snip at top and bottom of each to make a place for the mast to slip through.
Step 7: Gently curve the sails with your fingers. Thread the large sail on to the mast first. Then add the small sail. Finally, cut out the flag and coat back with glue stick. Wrap around the top of the mast and press sides together.
Step 8: Insert Crayola crayons, and set sail for fun!
What are you thankful for?


