Posts

Chonky Boys: The Chocolate Chip Cookie Ice Cream Sandwiches that Scream Summer!

Image
Featuring my thick and nuggy Chonky Boy Chocolate Chip Cookies, these ice cream sandwiches are the stuff that summer dreams are made of.  If you've ever had the Cookie Ice Cream Sandwich at Disneyland , you are going to LOVE these!  These big and bold chocolate chip cookies are based on a recipe from my culinary school studies at Auguste Escoffier, but with a few modifications to give them that Jennuine touch.  They make the perfectas book for a fat slice of real vanilla bean ice cream.  And those mini chips?  You just gotta have that extra cronch! Thank goodness this recipe only makes 8 sandwiches, otherwise I would be eating them for breakfast lunch and dinner.  This way, my big family can help save me from my inner child diet-saboteur.   Print With Image Without Image Chonky Boy Chocolate Chip Cookie Ice Cream Sandwiches Yield: 8 Author: Jenn Erickson Loaded with chocolate chips and buttery, brown-sugary vanilla flavor, these mall-sized cookies form a perfect partnership with a

DIY: Faux Mercury Glass Pedestal Bowl
(From Dollar Store or Thrift Store Finds)

Image
I've loved seeing a resurgence in the popularity of mercury glass. It's showing up everywhere these days, but true mercury glass can be prohibitively priced.     Fortunately, creatives in blogland have figured out a simple technique for mimicking the look so that you can whip up a whole collection for the price of a single piece from a store.    Combining the technique I learned from Katies Rose Cottage , and a popular dollar store craft, I've made my own version of a Mercury Glass Pedestal Bowl that I saw HERE for $65.95.  My version cost only $2 (plus the small amount of paint and glue I used in the project).  Faux Mercury Glass Pedestal Bowl DIY Supplies Glass candlestick Glass bowl E-6000 Glue Krylon Looking Glass Mirror Spray Spray bottle filled with 50/50 water/vinegar A soft lint-free cloth (or Viva paper towel)   I purchased these two pieces from the Dollar Tree.  Total cost:  $2 Step 1:  Run a bead of E-600

Crispy Almond-Butter Power Balls ~ A nutritious and delicious snack that's easy for kids to make!

Image
Last week I had the pleasure of hosting a group of Brownie and Junior Girl Scouts at my house to earn a badge for learning to make nutritious snacks .  The most popular snack, with both girls and parents, by far was the Crispy Almond - Butter Power Balls .  They're packed with healthy ingredients and are a terrific energy snack.  They're loaded with protein, calcium, antioxidants, whole grains, omega 3s and taste great !  They're easy for kids to make and can be stored in the freezer for up to three months . Crispy Almond Butter Power Balls (adapted from fixmeasnack.com )    Time:  Approx. 10 minutes Yield:  Approx. 20  ¾ cup powdered milk 1 cup crispy brown rice cereal (Envirokidz Organic Koala Crisp is what we like) 2 tablespoons wheat germ 2 tablespoons ground flaxseed ¼ teaspoon salt ¼ cup mini dark chocolate chips ½ cup smooth almond butter ¼ cup honey 1 teaspoon vanilla extract 1 tablespoon organic coconut oil Optional co

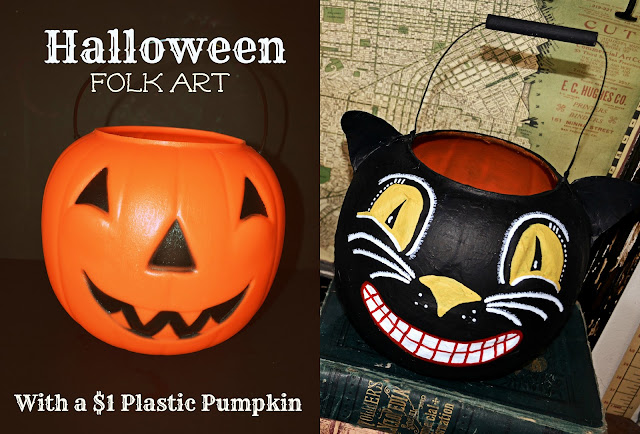
Vintage Style Folk Art Black Cat Halloween Bucket
(made from a $1 plastic pumpkin)

Image
One of my favorite characters from vintage Halloween folk art is the black cat ~ always sporting a mischievous look and a cheeky grin.     Last year, I transformed a trio of styrofoam pumpkins from the dollar store into paper mache folk art .   This year, with the same $1 budget in mind, I set to work on a classic blown plastic jack-o-lantern treat bucket -- the same jolly guy that's been around since I was a kid.     Although I'm nostalgic for his familiar orange mug, I thought it would be fun to transform him into a wiley black cat.  So, one afternoon, my daughter and I grabbed an old newspaper and our Mod Podge and set to work... Vintage-style Halloween Folk Art Black Cat 1 blown-plastic pumpkin treat bucket, any color Newspaper Mod Podge or Paper Mache paste E ar template (download HERE ) Heavy card stock or a manilla folder for the ears pencil and scissors Paint brus hes of various sizes Black acrylic paint Assorted acrylic pa

Candie Cooper's NECKLACEOLOGY ~ The Ultimate How-to Guide for Aspiring Jewelry Makers and Practiced Beading Enthusiasts

Image
The right necklace can be a fashion keystone -- bringing a whole outfit together for a polished and haute look.  An artfully crafted necklace is a wearable work of art -- an art which to some, like myself, is all at once fascinating and intimidating.   necklaceology begins with 14 pages of terminology for the materials and tools of the trade indexed with full-color photos, full descriptions and tips. For those not yet fluent in the vernacular of crimp beads, scrimp findings, clamshells and cup chains, Candie Cooper's* new book, necklaceology , from Lark Jewelry & Beading , demystifies the art of jewelry making, taking you step-by-step through terminology, techniques, and projects with which to build the skills and drive the passion of any aspiring jewelry artist.   necklaceology breaks down all the techniques you'll need to know to launch into the world of jewelry making in an easy-to-follow, step-by-step format accompanied by color photographs of each s

Just for Fun ~ Vintage Images with Empowering Messages for Girls

Image
Rainy days make me feel reflective and nostalgic.  So I started puttering around, adding little quotes and sayings to some of my old family photographs.  What started out as a single idea (the photo below) -- a celebration of quirky girls everywhere -- became a tidy little collection of images with empowering messages. Please feel free to share and use as you wish. (non commercial purposes only, of course)           "Always be a first-rate version of yourself, instead of a second-rate version of somebody else."  ~Judy Garland "Be who you are and say what you feel, because those who mind don't matter and those who matter don't mind."  ~Dr. Seuss  

Vintage Button and Cut Crystal Necklace Tutorial

Image
Many moons ago I fashioned a necklace from vintage buttons passed down from family. Having no experience whatsoever in jewelry-making, I strung the buttons and beads on a length of elastic cord and it lasted for a good while. It was imperfect, but lovely, and not a day went by where I wore it and didn't get a compliment from passersby.  Recently, the elastic cord gave its last and the buttons and beads went cascading across the dining room floor. They've been sitting on a silver tray patiently waiting for me to summon the courage to restring them in a more permanent and artful fashion.  Recently, my friends at Lark Jewelry and Beading sent me a review copy of Candie Cooper's new book, Necklaceolgy .   It was love at first glace -- just look at this cover... On page 39 I found the "Kiss the Bride" necklace tutorial.  Candie's technique of using three strands of wire was just the trick I had been looking for to string those tri